Posts

Showing posts from February, 2008

Loading, playing and stopping sounds in AS 3.0.
Image
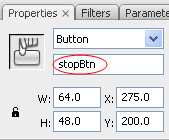
In this tutorial we will learn how to load external mp3s and how to control them. We will work with URLRequest class, Sound class, SoundChannel class and use the CLICK mouse event. After completing this tutorial you will be able to add sounds to your application. Let’s see how. 1. Create a new file by going to File > New select Flash file (ActionScript 3.0) and click Ok. 2. Insert two new layers by going to Insert > Timeline > Layer. 3. Double click on the top layer and name it actions , name the second one play_btn and the third stop_btn . 4. Lock the actions and play_btn layers and select the stop_btn layer. Go to Window >Common Libraries > Buttons. Scroll down until you find the playback rounded folder. Double click on the folder to open it and select rounded green stop button and drag it to the stage. 5. Select the button set its instance name to stopBtn , the width = 64, height=48, x= 275, and y=200. 6. Lock the stop_btn layer, unlock the play_btn layer and select ...
How to make a custom button using Flash CS3 and AS 3.0.

Image
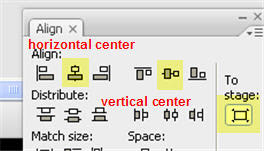
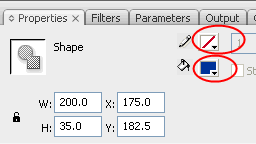
In this tutorial we will build a button. Flash IDE comes with a large library of buttons, these are good for building something fast, but when we need to make a menu for a site, a button for a game or something else it’s a good choice to make your own buttons.Our button will have a little bit of animation and it’s actually simple to make. We will draw the button on the stage and after we will control the over and out state with ActionScript code. Let’s see how we will make this button. 1. Create a new file by going to File > New select Flash file (ActionScript 3.0) and click Ok. 2. Insert a new layer by going to Insert > Timeline > Layer. 3. Double click on the top layer and name it actions, name the second layer button. 4. Select the button layer, go to the Tools panel select the Rectangle tool. On the stage click and drag to create a rectangle. With the rectangle selected in the Properties Inspector set its width = 200, height = 35, stroke to none and the color to #003399. 5...

Format text with CSS in ActionScript 3.0.

Image
Hello Flash lovers. In the last tutorial we have learned how to load external text. In this tutorial we go a step further and we will learn how to stylize, format our text using an external CSS file. This approach offers a lot of flexibility because you can modify the CSS file at any time and your text will look different, you can do that without republishing your swf file. Let’s see how we can accomplish that. 1. Create a new file by going to File > New select Flash file (ActionScript 3.0) and click Ok. 2. Insert a new layers by going to Insert > Timeline > Layer. 3. Double click on the top layer and name it actions , name the second one text_field . 4. Select the text_field layer, go to the Tools panel select the Text tool. On the stage click and drag to create a text field. In the Properties panel set the Text type to Dynamic, the Line type to Multiline, press the Render text as HTML button(this is important because the CSS style can be applied to Text Fields that display t...

How to load, display and scroll external text with ActionScript 3.0.

Image
Hello everybody. Today we will look at how to load external text, display it and scroll it with buttons. We will work with URLRequest class, URLLoader class and use some MouseEvents. Not much to say about this topic, we will not build some fancy application, but this is very useful when working with external text. Let’s begin. 1. Create a new file by going to File > New select Flash file (ActionScript 3.0) and click Ok. 2. Insert two new layers by going to Insert > Timeline > Layer. 3. Double click on the top layer and name it actions, name the second one buttons and the third text_field. 4. Select the text_field layer go to the Tools panel select the Text tool. On the stage click and drag to create a text field. In the Properties panel set the Text type to Dynamic the Line type to Multiline, press the show borders around text button and set the instance name to text_field. Set the other measurements like in the picture. 5. Select the buttons Layer. Go to Window >Comm...

Draw Custom shapes with ActionScript 3.0.

Image
Hello everybody. In this tutorial we will draw something with ActionScript.After completing this tutorial you will be able to draw unique, random, custom and strange shape (backgrounds), all depends of your imagination. The sketch is easy customizable, you replace my shape with yours and you get different result. Let’s see how. 1. Go to File – New select Flash file (ActionScript 3.0) and click Ok. 2. In the Properties panel set the color of the stage to black. 3. From the Tools panel select the oval tool. In the Properties panel set the stroke to none and pick a color. On the stage draw a circle. select the circle and in the Properties panel set the width and height to 50. 4.With the circle selected go to Window > Color this will open the Color panel. Set the color panel like in the picture. You insert a new color handler (that little house shape) by placing the mouse between the existing one and click. When your mouse is between the two existing handlers a plus sign appear b...

Animated Custom Cursor (ActionScript 3.0)

Image
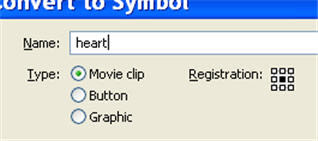
Hello. In my country is Valentine Day (I hope that in yours too) so I thought to make something related with this day. So we will build an animated custom cursor, this cursor is represented by a heart. This cursor is easy customizable, you can replace the heart (this will be a graphic) with whatever you want and use it where you want. Enough with the talk let’s get to work. 1. Go to File – New select Flash file(ActionScript 3.0) and click Ok. 2. On the stage draw a heart with whatever tool you are comfortable too. Select the heart hit F8 to convert it intro a symbol. Set it’s name to heart ,type to MovieClip and registration point to center and click ok. 3.Select the heart and hit delete on your keyboard. This will delete the heart from the stage but the heart will still exist in the Library panel. 4.Go to Window – Library this will open the Library panel. In this panel you should have the heart MovieClip. Selected right click and select Linkage .In the Linkage panel select Export f...

Advanced preloader ( AS 3.0 and AS 2.0 version).

Image
Today we will build a preloader witch will inform our users how much of our content is loaded. For this tutorial I will show you both as 3.0 and as 2.0 code. Will build the same graphical interface but will write as 3.0 code for those that use Flash CS3 and as 2.0 code for those that use Flash 8. Ok let’s begin. 1.Go to File – New select Flash file(ActionScript 3.0),if you use Flash CS3 or if you use Flash 8 chose Flash Document and click Ok.It is possible to write actionscript 2.0 in Flash CS3 but I suppose that if you have Flash CS3 you use as 3.0 and as 2.0 if you have Flash 8. 2.Add a new layers (Insert – Timeline – Layer). 3.Select the top layer and name it actions, select the next layer and name it preloader.The naming of the layers is not required but to be well organize I name them. 4.Lock the actions layer, select the preloader layer pick the rectangle tool from the tools panel and draw a rectangle set it’s color to :your choice, set it’s stroke to none ,the width to 300 a...

Photo Gallery with transitions(AS 3.0).

Image
     In this tutorial we will make a Photo Gallery.Will use ActionScript 3.0 because we want to leave ActionScript 2.0 in the back.ActionScript 3.0 it’s much cleaner and powerfull. Our gallery will look like the old Polaroid photos. We will learn how to load external content, how to setup a timer, how to work with transitions and other things. The finally gallery will look like this: First let’s build the graphical part. 1.Go to File – New select Flash file(ActionScript 3.0) and click Ok. 2.Add three new layers (Insert – Timeline – Layer). 3.Now we should have four layers. Select the first layer from the bottom double click on his name and rename it to frame . Select the next layer name it bg, select the next layer name it display and finally set the name of the last layer to actions and lock it. Your timeline should look like this: 4.In the Properties panel change the color of the stage to black. 5.Select the frame layer, pick the Rectangle tool...

Custom Scrollbar

Image
In today tutorial we will make a custom scrollbar. For this tutorial we will use ActionScript 3.0 There are a lot of tutorials on the net with this subject but more of them are using a static text field (they draw a text field on the stage and type the text in that field).This approach does not offer a lot of flexibility. In our tutorial we will use a dynamic text field (the text is not typed on the stage it comes from an external source). Ok. Now let’s go back to work. 1.Go to File – New select Flash file(ActionScript 3.0) and click Ok. 2.Double click on the layer1 name and rename it text. 3.Select the Text tool in the Properties panel set the Text type to Dynamic text, the Line type to Multiline and set the color to black.On the stage click and drag to make a text field. In the Properties panel set the width to 200 ,height to 150, x to 175 and y to 125.Set the instance name myTfield. Your settings must like like this: 4.Insert new layer ( Insert – Timeline – Layer ) dou...

Random Bubbles made with ActionScript 3.0

Image
This is my first tutorial in witch I will explain how to make random bubbles with ActionScript 3.0. It’s a really nice effect.This is how our effect will look: Let’s start. 1.Go to File – New – and make a new document 2.On the new document rename the first layer to bg (from background) and make a new layer and name it actions. Lock the actions layer. 3.Go to the tools palette select the rectangle tool and on the bg layer draw a rectangle that will cover the work area. Select the rectangle go to Windows-color .In the color palette select the fill ,set the gradient type to linear.For the first color type: #33CCFF and for the second #0033FF. Ok now we have the background finished. 4.Go to insert and select New Symbol. Set the name to bubbles and type to MovieClip and click ok. 5.From the tools palette select the oval tool set the stroke to none and for the fill color pick a light blue, then draw a circle. Select the circle and in the Properties panel type 40 for the width...

My blog:day one.

This month I will make a year since I start learning (and enjoy learning )about web and programming. I started with C# (not a good choice since I was a beginner without any knowledge about programming) ,I continued with HTML and CSS, passed a little throw PHP and MySql, after that I want to learn some software to help me to prepare my pictures, to make web layouts, so I choose Photoshop and Illustrator and finally I discovered Flash and stick to Flash. Let's go back to Flash. I like Flash for it's design capabilities but a love Flash for his programming language, ActionScript. I have made this blog with the intention to share with you my knowledge about Flash/ActionScript(primary),to bring good links and useful resource about web. I hope to write good and regularly posts. Note:Sorry for grammatical mistakes and misspelling. English is not my primary language. Date: 2008-02-07