Load multiple images with actionscript 3
In this tutorial we will learn how to load multiple images using actionscript 3 and xml. Let's see how we can do this!
 ro/sorin/utils/ contains the TextLoader class, we will use this class to load the xml file.
If you want to fallow along you can download it TextLoader.as, place the file inside the utils folder.
The other folders are self-explanatory.
Every image tag contains the data for one image.
The url is a attribute of the image tag and contains the path to the image file.
Find on your hard drive or web 5 images, rename them to img_01.jpg …... img_05.jpg and place them inside the images folder. The dimensions of the images doesn't matter, we will not build something eye catching we will concentrate on the technique, my images are 500X375.
Create a similar xml file and save it as images.xml inside the assets/xml folder.
In the properties panel change the stage size to 500X375.
Insert a new layer (Insert>Timeline>Layer), name the top one actions and the other preloader.
Select the preloader layer, from the Tools panel pick the Text Tool, in the Properties panel set its type to Dynamic Text and on the Paragraph sub-panel for Format property chose Align center. On the stage click and drag to make a text field with the same width as the stage(375), center the text field on the stage both horizontal and vertical.
Make sure that the text filed is selected and in the Property panel set it's instance name to preloader.
To maintain the intended appearance of the preloader text(our preloader it's text based) on user machines we must embed the used font.
To do this with the text field selected go to the Properties panel under Character sub-panel and click on the embed button like on the image bellow.
 Because our preloader text will contain Uppercase, Lowercase, Numerals and Punctuation we will chose only those from the Character ranges options(see image bellow). It's not recommended to embed all the characters of a font because this will increase the swf size, try to embed only the characters that your text field needs to display.
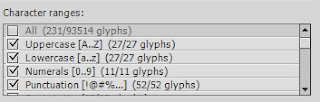
The code executions begins by calling the init() function, witch starts the loading of xml file, when the loading process is completed the onComplete() function is called.
Inside the onComplete() functions we extract the paths to the images from the loaded xml, add them to the urlList array and begin the load of the first image by calling the loadImage() function.
Within the loadImage() function we initialize the load of the image(loader.load()), add the Progress event(this will inform us about how much of our image is loaded) and add the Complete event(this will tell us when the image is complete loaded).
onProgress() function is called every time the Progress event is fired, when this happened we update our preloader.
When the image is completed loaded the Complete event fires and loaderOnComplete() function is called. Inside this function after we add the image to the imgList array, increase the counter by one, we check to see if the loading process should continue(there are more images to load or this was the last). If the counter is less or equal with the totalImages-1 there are images to load and we call the loadImage() function, if the counter is greater all the images are loaded and we call the showImages() function.
The role of the showImages() function is to make the images visible.
Because we are working locally the load of the images happens very quick and it's possible to not see the loading progress, lucky Flash IDE offers some nice feature that allows us to see how our movie will behave on different connections speed.You can access this feature from the swf menu, go to View > Download Settings, pick a connection speed and press Ctrl + Enter to simulate the download.
I hope that you enjoyed the tutorial. If you have questions, suggestions, doubts about the tutorial don’t hesitate to comment.
Until next time have fun learning Flash.
Download the source files for here:Load Multiple Images with Actionscript.
1. Establish the project structure.
Make the same folder hierarchy like in the image below:If you want to fallow along you can download it TextLoader.as, place the file inside the utils folder.
The other folders are self-explanatory.
2. Creating the xml file structure.
The xml file looks like this:
<?xml version="1.0" encoding="utf-8"?>

<images>

<image url="assets/images/img_01.jpg"/>

<image url="assets/images/img_02.jpg"/>

<image url="assets/images/img_03.jpg"/>

<image url="assets/images/img_04.jpg"/>

<image url="assets/images/img_05.jpg"/>

</images>
Every image tag contains the data for one image.
The url is a attribute of the image tag and contains the path to the image file.
Find on your hard drive or web 5 images, rename them to img_01.jpg …... img_05.jpg and place them inside the images folder. The dimensions of the images doesn't matter, we will not build something eye catching we will concentrate on the technique, my images are 500X375.
Create a similar xml file and save it as images.xml inside the assets/xml folder.
3. Creating a new .fla file.
Create a new file by going to File > New(Ctrl+N) select ActionScript 3.0 and click Ok. Save it as loadMultipleImages.fla inside the loadMultipleImages folder.In the properties panel change the stage size to 500X375.
Insert a new layer (Insert>Timeline>Layer), name the top one actions and the other preloader.
Select the preloader layer, from the Tools panel pick the Text Tool, in the Properties panel set its type to Dynamic Text and on the Paragraph sub-panel for Format property chose Align center. On the stage click and drag to make a text field with the same width as the stage(375), center the text field on the stage both horizontal and vertical.
Make sure that the text filed is selected and in the Property panel set it's instance name to preloader.
To maintain the intended appearance of the preloader text(our preloader it's text based) on user machines we must embed the used font.
To do this with the text field selected go to the Properties panel under Character sub-panel and click on the embed button like on the image bellow.

4. The code.
Select frame 1 from the actions layer hit F9 to open the ActionScript panel and paste the next code:
import ro.sorin.utils.TextLoader;

//handles the load of the xml file

var xmlLoader:TextLoader;

var xml:XML;

var xmlList:XMLList;

var urlList:Array = [];

//keeps track of the number of images loaded

var counter:uint = 0;

var urlRequest:URLRequest;

var loader:Loader = new Loader();

var bitmap:Bitmap;

var img:Sprite;

var totalImages:uint;

var imgList:Array = [];

function init():void{

xmlLoader = new TextLoader("assets/xml/images.xml");

xmlLoader.addEventListener(Event.COMPLETE, onComplete, false, 0, true);

}

function onComplete(event:Event):void{

xmlLoader.removeEventListener(Event.COMPLETE, onComplete)

xml = XML(event.target.content);

xmlList = xml.children();

xmlLoader = null;

for(var i:int=0;i<xmlList.length();i++){

urlList.push(xmlList[i].@url);

}

totalImages = xmlList.length();

loadImage();

}

function loadImage():void{

urlRequest = new URLRequest(urlList[counter]);

loader.contentLoaderInfo.addEventListener(ProgressEvent.PROGRESS, onProgress, false, 0 ,true);

loader.contentLoaderInfo.addEventListener(Event.COMPLETE, loaderOnComplete, false, 0 ,true);

loader.load(urlRequest);

}

function onProgress(event:ProgressEvent):void{

var percent:Number = event.bytesLoaded/event.bytesTotal *100;

preloader.text = "Loading: " + (Math.ceil(percent)).toString() + "  % " + " of " + (counter+1).toString() + " / " +  totalImages.toString();

}

function loaderOnComplete(event:Event):void{

loader.contentLoaderInfo.removeEventListener(ProgressEvent.PROGRESS, onProgress);

loader.contentLoaderInfo.removeEventListener(Event.COMPLETE, onComplete);

bitmap = Bitmap(event.target.content);

img = new Sprite();

img.addChild(bitmap);

imgList.push(img);

loader.unload();

counter++;

if(counter <= totalImages - 1){

loadImage();

}else{

loader = null;

urlList = null;

showImages();

}

}

function showImages():void{

for(var i:uint = 0; i<imgList.length;i++){

imgList[i].x = i*25;

addChild(imgList[i]);

}

}

init();
5. Code explication.
Let's look at the flow of the code.The code executions begins by calling the init() function, witch starts the loading of xml file, when the loading process is completed the onComplete() function is called.
Inside the onComplete() functions we extract the paths to the images from the loaded xml, add them to the urlList array and begin the load of the first image by calling the loadImage() function.
Within the loadImage() function we initialize the load of the image(loader.load()), add the Progress event(this will inform us about how much of our image is loaded) and add the Complete event(this will tell us when the image is complete loaded).
onProgress() function is called every time the Progress event is fired, when this happened we update our preloader.
When the image is completed loaded the Complete event fires and loaderOnComplete() function is called. Inside this function after we add the image to the imgList array, increase the counter by one, we check to see if the loading process should continue(there are more images to load or this was the last). If the counter is less or equal with the totalImages-1 there are images to load and we call the loadImage() function, if the counter is greater all the images are loaded and we call the showImages() function.
The role of the showImages() function is to make the images visible.
6. Testing the code.
If you had the patience to fallow the tutorial now is time to test the code, press Ctrl + Enter to test it.Because we are working locally the load of the images happens very quick and it's possible to not see the loading progress, lucky Flash IDE offers some nice feature that allows us to see how our movie will behave on different connections speed.You can access this feature from the swf menu, go to View > Download Settings, pick a connection speed and press Ctrl + Enter to simulate the download.
I hope that you enjoyed the tutorial. If you have questions, suggestions, doubts about the tutorial don’t hesitate to comment.
Until next time have fun learning Flash.
Download the source files for here:Load Multiple Images with Actionscript.


Comments
Am I just slow?
Fonts should be embedded for any text that may be edited at runtime, other than text with the "Use Device Fonts" setting. Use the Text > Font Embedding command to embed fonts.
====================
---Error loading text/xml file---
My new compiler error message is:
Fonts should be embedded for any text that may be edited at runtime, other than text with the "Use Device Fonts" setting. Use the Text > Font Embedding command to embed fonts.
Error #2044: Unhandled IOErrorEvent:. text=Error #2035: URL Not Found.
This error "Fonts should be embedded for any text that may be edited at runtime, other than text with the "Use Device Fonts" setting. Use the Text > Font Embedding command to embed fonts. " it's more a suggestion that an error the swf will still compile. It's recommended to embed the fonts so the text can maintain it's original appearance on users machine, I have added this to the tutorial too.
Your swf won't compile because of this error:
"Error #2044: Unhandled IOErrorEvent:. text=Error #2035: URL Not Found."
make sure that the images are named as in the xml file and placed in the right location.